With all the Christmas presents out of the way, it’s time to start work on some projects for myself. I’ve started with a router table. A router is essentially an electric motor with a collet to hold different shaped bits at 90° to a base plate. Typically the shank (or shaft) of the bit is either 1/4″ or 1/2″. I have a couple of routers, one of which can do either sized router bit. It’s an amazingly flexible tool. The router is often used as a hand held tool for example putting a shaped edge on a work piece – known as taking the tool to the work piece. However sometimes you need to take the work piece to the tool. A good example of this using the cope and stick router bits I got from Freud.

The two bits on the left are used to make rails and styles for a raised panel door.
You notice the grain at the top of the door is running horizontally which is a rail, and the style runs down the side of the door. The router can make the cope and stick joinery with ease. You can see in the image below how the two pieces go together:

The bit set can put a really nice profile on the styles. None of this would be possible without a router table. The router is spinning the hunk of metal at around 15,000 rpm so it just isn’t safe.
It’s a good idea to do the end grain on the rails first. Cutting wood across the grain often results in tear out. This occurs where the fibers of the wood aren’t cut cleanly, especially if the tool is dull or hasn’t been cleaned recently. The rails also need the same profile as the styles, and you can remove a lot of the tear out.

The rails are only 4″ long and with that much torque they could easily be whipped out of my hands, possibly injuring me in the process. So I’ve built a coping sled. The table has a mitre slot running parallel to the edge of the table, allowing me to run sleds or a mitre gauge down the slot. The coping sled is just a thin piece of ply wood with a runner on the bottom, and a fence at the back set at 90º to the mitre slot. The plywood is small enough that it keeps away from the router bit. It can also be used to help prevent tear out by putting in a piece of scrap in behind the work piece.
As a test of the new router table, I’ve decided to build a small portable apothecary cabinet.

You can find the Sketchup file in the media folder, or here.
The side panels are exposed in the sketchup so you can see the shelves more clearly. Each space inside the cabinet will have a drawer. I’ve not yet decided about the joinery for those just yet, but I am leaning towards machined dovetails (seeing as I have a dovetail jig). I’m going to put a secret bottom into the base. I have some magnets I removed from some failed hard drives which I’ll epoxy in place and the can grab onto some screws placed on glue blocks on the underside of the cabinet. That’ll let me adjust the depth of the panel. The panel will be able to be pushed out by removing the bottom draw and pushing a finger through a 3/4″ hole.
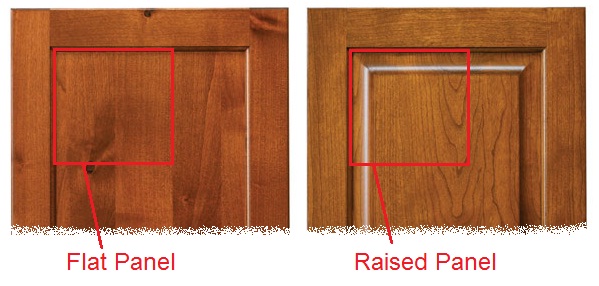
The main carcass will be made from red oak, though I’ve been inspired by The Woodwhisperer’s Fancy Raised panel, so I’m going to attempt that for the doors, using some soft maple for the panels, and red oak overlaying the top. I’ve used the same cope and stick router bits to create the side panels for the carcass, but use flat pieces instead of raised panels. I thought that using raised panels on the side would detract from the overall look. I haven’t yet decided on a finish, though I’m leaning towards either Danish oil, or shellac and poly. I’m more comfortable with shellac and poly, and the cold weather is going to make applying the oil more complicated due to very limited amount of time in a warm shop.
My challenges for this project will include trying to use my table saw or jointer as little as possible as it’s -10c (12F) in my barn workshop which I feel makes it unsafe. I’m limited therefore to portable power tools, my planer, my drill press, mitre saw and bandsaw. I’ve not done much resawing before, so that’s going the fun.
The wood came to me second hard as 12/4 stock, and I’d managed to get some of it milled up before the cold weather set in. I’ve got a new 1/2″ 3 tooth per inch (TPI) blade in my bandsaw which is making resawing pretty easy going, even with my little 1/2HP bandsaw. I’ve been resawing the pieces, then running both pieces of stock through the bench top planer to smooth the surfaces off and bring the work piece sides back to flat and parallel and remove the washboard saw marks
So far I’ve milled and glued up the two side panels for the carcass. As I was finishing gluing the second panel I noticed a problem with it as it was twisting significantly. As the glue was still wet, I put some cauls diagonally across the panel to straighten them out. Time will tell how much of an issue that will be:


The other panel is fine:


The glue has been drying for a couple of days so they’ll be done by Saturday ready for the next step in the project: routing the slots of the shelving, and the rabbets for the top and bottom panels and re-saw the wood for the top and bottom panels.
The shelves are only 1/4″ thick. I want to do stopped dadoes for the shelves, but I don’t have a 1/4″ chisel. My current plan is to round over the leading edge of the shelves so they fit in the dado left by the router. I’ve already taken the panels out of the clamps and it’s looking pretty good. One of the rails isn’t quite right but I can clean that up with a plane.
The plan for my next session:
- Clean up the panels I just glued to insure the tops of the panels are square. I noticed one of the rails is not quite in place. Should be able to clean that up with a hand plane and a little sanding. Also some of the rails aren’t quite flush with the styles, so some sanding will be required.
- Cut the rabbets in the top and bottom of the side panels. This will determine how thick the top and bottom panels will need to be. The plan says 1/2″, but it’s going to be decided by the rabbets. I have a couple of 3/8 rabbeting bits, so that’ll probably do quite nicely. I can cut them on the router table with the coping sled and a backer board to prevent tear out.
- Re-saw some more stock. I’m going to need some for the top and bottom panels, and the shelves which are 1/4″ thick. It’s all going to need gluing up as I know the stock I have isn’t wide enough.
I don’t know if I’m going to have much more time than that, but if I do then I’ll need to route the slots in the side panels to accept the shelves. I won’t be able to route the slot in the top of the carcus for the divider because the glue up won’t be dry in time. I will also need some more stock for the base and the molded piece at the bottom. I’ve already glued up the the molded piece for the top. I’m not going to cut that down any further until the rest of the cabinet is finished.


You must be logged in to post a comment.