Measure twice, glue once?

I’ve finally managed to glue all the pieces together of the main case.  It took all of my long clamps to keep it together.

Andrew’s _IMG_0899 Andrew’s _IMG_0898


That meant there were no more clamps to glue up the panel for the base of the cabinet. So I took a leaf out of Izzy Swann‘s book:

I put some packing tape down on the work top to stop the panel from gluing itself to the surface.

Andrew’s _IMG_0902 Andrew’s _IMG_0901


Unfortunately, after the glue had dried I discovered I’d measured it wrong and I didn’t need the middle pieces at all, that the two long pieces glued together would be more than wide enough. *sigh*

After the glue had dried on the case, I discovered that the glue on the top and bottom rabbet hadn’t quite set or it was just a dry joint – not enough glue. So I had to put some more glue in between the top and bottom corners and the case:

Andrew’s _IMG_0903 Andrew’s _IMG_0904


This time I used a cinder block as a weight to clamp it up, with some lateral clamping to make sure the case stayed square the sides didn’t splay outwards. That did the trick! The main case is now complete.

I’ve marked up the top. I want a 3/4″ overhang round the outside of the case. I also need to take into account the doors on the front of the case, which will also be 3/4″ thick, so I needed to double up the overhang. I took some 3/4″ scrap plywood (doubled up at the front) and drew round the top. NB: 3/4″ plywood isn’t 3/4″ thick. The cheap crap I have from China is 18mm which is 0.708″ – a long way from 0.75″. Never the less, it’s close enough and if I cut a little bit wide it’ll look just fine. Once the top and bottom are cut out, then I’ll route the edge and fix the top to the case. I’m planning to use some figure 8 connectors, or similar arrangement. The bottom is a different matter and since I have to rework the panel for there, I’m consider a different strategy.

A pox on epoxy

So the glue up of the side panels didn’t go quite as planned, most because one of the panels twisted. The cawls helped a lot, but there is still a minor twist in it. I had considered building a new side panel, but I think I’m going to persevere with it for now. I see a lot of clamping my future!

I also had a minor blow with some epoxy. I don’t use a lot of epoxy, so I’ve been buying the 5 minute stuff that comes in the twin syringe so you get equal doses of resin and hardener. Except I don’t think the batch I mixed to seal and stabilize the knots on one of the panels had enough hardener in it or I didn’t mix it enough. I mixed and poured it yesterday evening in preparation for today’s day in the shop, and came down this morning to a goey mess. The hole I sealed on the other panel was fine so I know the epoxy itself was good, but I had mixed the batches separately. I’ve managed to clean off the resin from the panel and I’ll have another go at sealing the holes. I’ve sanded the side panels with some 80 grit as it’s easier to do that whilst it’s flat. This has removed the majority of the epoxy mess, but my sander is too big to fit in the flat panel so I’m going to have to have another go by hand. I’ll probably sand all the way up to 220 in preparation of finishing as it’ll be easier to do before the glue up.

With the rabbets in the side panel done (very easy on my new router table :), I’ve glued up some panels for the top and bottom of the carcass to the desired width.

I finished today laying out the dadoes for the shelves. Next week, I’ll route the dadoes and resaw the stock for the shelves and dividers. If I have time, I’ll glue up the main carcass.

Epilogue

So my re-working of the epoxy has improved the situation for the long dark streak but the two holes that had already been filled by epoxy, I wasn’t so lucky. They were rather deep and I didn’t take the old epoxy which it turns out was a mistake. Overnight the old epoxy half hardened and had gone white. So I spent an hour digging out the old epoxy and cleaning out the holes ready to be refilled. I’ll try again to fill the holes again tonight.

The long dark streak through the middle of the board caused by a branch coming out from the trunk which I’d stabilized with epoxy. Epoxy is gap filling meaning as you apply it, it will flow into gaps. I pasted a layer of epoxy on the dark streak which set good and hard. Ordinarily I’d use my random orbit sander to remove the excess, but the panel is too narrow to get the sander in and anyway the round disc won’t go into the corners. So I’ve resorted to using a utility knife blade to remove the excess and whilst I’m at it used it as a cabinet scraper to smooth the surface. This is very effective and can get wood smoother than 220 grit sand paper. If I had a proper cabinet scraper it would be quicker and more efficient.

A new shop tool and a new project

With all the Christmas presents out of the way, it’s time to start work on some projects for myself. I’ve started with a router table. A router is essentially an electric motor with a collet to hold different shaped bits at 90° to a base plate. Typically the shank (or shaft) of the bit is either 1/4″ or 1/2″. I have a couple of routers, one of which can do either sized router bit. It’s an amazingly flexible tool. The router is often used as a hand held tool for example putting a shaped edge on a work piece – known as taking the tool to the work piece. However sometimes you need to take the work piece to the tool. A good example of this using the cope and stick router bits I got from Freud.

The two bits on the left are used to make rails and styles for a raised panel door.
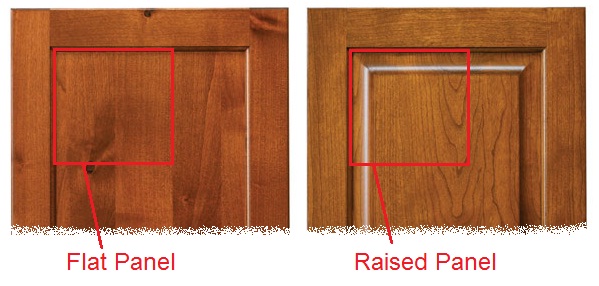
You notice the grain at the top of the door is running horizontally which is a rail, and the style runs down the side of the door. The router can make the cope and stick joinery with ease. You can see in the image below how the two pieces go together:

The bit set can put a really nice profile on the styles. None of this would be possible without a router table. The router is spinning the hunk of metal at around 15,000 rpm so it just isn’t safe.

It’s a good idea to do the end grain on the rails first. Cutting wood across the grain often results in tear out. This occurs where the fibers of the wood aren’t cut cleanly, especially if the tool is dull or hasn’t been cleaned recently. The rails also need the same profile as the styles, and you can remove a lot of the tear out.

The rails are only 4″ long and with that much torque they could easily be whipped out of my hands, possibly injuring me in the process. So I’ve built a coping sled. The table has a mitre slot running parallel to the edge of the table, allowing me to run sleds or a mitre gauge down the slot. The coping sled is just a thin piece of ply wood with a runner on the bottom, and a fence at the back set at 90º to the mitre slot. The plywood is small enough that it keeps away from the router bit. It can also be used to help prevent tear out by putting in a piece of scrap in behind the work piece.

As a test of the new router table, I’ve decided to build a small portable apothecary cabinet.

Sketchup of Apothecary Cabinet

You can find the Sketchup file in the media folder, or here.

The side panels are exposed in the sketchup so you can see the shelves more clearly. Each space inside the cabinet will have a drawer. I’ve not yet decided about the joinery for those just yet, but I am leaning towards machined dovetails (seeing as I have a dovetail jig). I’m going to put a secret bottom into the base. I have some magnets I removed from some failed hard drives which I’ll epoxy in place and the can grab onto some screws placed on glue blocks on the underside of the cabinet. That’ll let me adjust the depth of the panel. The panel will be able to be pushed out by removing the bottom draw and pushing a finger through a 3/4″ hole.

The main carcass will be made from red oak, though I’ve been inspired by The Woodwhisperer’s Fancy Raised panel, so I’m going to attempt that for the doors, using some soft maple for the panels, and red oak overlaying the top. I’ve used the same cope and stick router bits to create the side panels for the carcass, but use flat pieces instead of raised panels. I thought that using raised panels on the side would detract from the overall look. I haven’t yet decided on a finish, though I’m leaning towards either Danish oil, or shellac and poly. I’m more comfortable with shellac and poly, and the cold weather is going to make applying the oil more complicated due to very limited amount of time in a warm shop.

My challenges for this project will include trying to use my table saw or jointer as little as possible as it’s -10c (12F) in my barn workshop which I feel makes it unsafe. I’m limited therefore to portable power tools, my planer, my drill press, mitre saw and bandsaw. I’ve not done much resawing before, so that’s going the fun.

The wood came to me second hard as 12/4 stock, and I’d managed to get some of it milled up before the cold weather set in. I’ve got a new 1/2″ 3 tooth per inch (TPI) blade in my bandsaw which is making resawing pretty easy going, even with my little 1/2HP bandsaw. I’ve been resawing the pieces, then running both pieces of stock through the bench top planer to smooth the surfaces off and bring the work piece sides back to flat and parallel and remove the washboard saw marks

So far I’ve milled and glued up the two side panels for the carcass. As I was finishing gluing the second panel I noticed a problem with it as it was twisting significantly. As the glue was still wet, I put some cauls diagonally across the panel to straighten them out. Time will tell how much of an issue that will be:

Andrew’s _IMG_0875 Andrew’s _IMG_0874 Andrew’s _IMG_0876

The other panel is fine:

Andrew’s _IMG_0878 Andrew’s _IMG_0877
The glue has been drying for a couple of days so they’ll be done by Saturday ready for the next step in the project: routing the slots of the shelving, and the rabbets for the top and bottom panels and re-saw the wood for the top and bottom panels.

The shelves are only 1/4″ thick. I want to do stopped dadoes for the shelves, but I don’t have a 1/4″ chisel. My current plan is to round over the leading edge of the shelves so they fit in the dado left by the router. I’ve already taken the panels out of the clamps and it’s looking pretty good. One of the rails isn’t quite right but I can clean that up with a plane.

The plan for my next session:

  • Clean up the panels I just glued to insure the tops of the panels are square. I noticed one of the rails is not quite in place. Should be able to clean that up with a hand plane and a little sanding. Also some of the rails aren’t quite flush with the styles, so some sanding will be required.
  • Cut the rabbets in the top and bottom of the side panels. This will determine how thick the top and bottom panels will need to be. The plan says 1/2″, but it’s going to be decided by the rabbets. I have a couple of 3/8 rabbeting bits, so that’ll probably do quite nicely. I can cut them on the router table with the coping sled and a backer board to prevent tear out.
  • Re-saw some more stock. I’m going to need some for the top and bottom panels, and the shelves which are 1/4″ thick. It’s all going to need gluing up as I know the stock I have isn’t wide enough.

I don’t know if I’m going to have much more time than that, but if I do then I’ll need to route the slots in the side panels to accept the shelves. I won’t be able to route the slot in the top of the carcus for the divider because the glue up won’t be dry in time. I will also need some more stock for the base and the molded piece at the bottom. I’ve already glued up the the molded piece for the top. I’m not going to cut that down any further until the rest of the cabinet is finished.
Kicking the tires on some red oak I picked up the other day

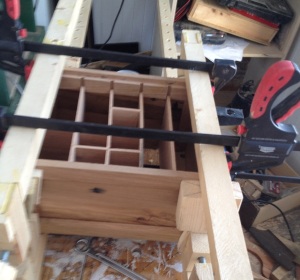
I got a little time at the end of today’s session where I didn’t have anything specific to do. I’d run out of clamps and done a little finishing. I figured I’d kick the tires a little and mill some of the stock. I didn’t get much time to look the stock over when I picked it up, but I did notice a little checking and one 12/4 did look like it was in a state – perhaps some rotting so I’ve kept that one separate until I can take a better look at it.

New Project: End table

The Wood

I recently bought some second hand red oak, about 100 bf. Most of it is 12/4 stock, 5 1/2″ wide and 40″ long, and about 25 6/4, 4″ x 25″ pieces. All of it is rough cut and had been stored in someone’s garage for 15 years so it was in need of quite a bit of attention before it can be used. There was one nail which I think I extracted whole, so I’m going to have to pay close attention to make sure there are no more nails embedded as I go.

I’ve been trying to decide what to do with the hoard. I’d like to build a new bench as the current one isn’t even remotely flat, but is made of particle board, but that’s a project for another day. In the meantime, I’d like to do something a little less elaborate. We do need some end tables for our couch. There are a few design considerations.

  • It needs to be something I’m capable of, but still stretches my skills
  • It needs to be capable of standing up to my two children climbing on it. This will most definitely be a test!

Seeing as I’ve got the wood, but not yet had a design I began milling the boards up, all of the 6/4 stock and 4 of the 12/4 stock. There’s a ton of information out there about how to mill wood ready for your project, but I recommend watching “The Jointers Jumping” at the Woodwhisperer.

The 12/4 stock is quite difficult to handle due to it’s weight. I’ve only got a 6″ jointer. The in feed and out feed tables are only about 24″ long so I can just about joint two edges without it tipping off the end of the out feed. Unfortunately I found some staples the hard way when my planer finished working the opposite side. I’ve now got a couple of dings in my planer blades. Not a major issue, just a little frustrating as now anything I run through it will have little ridges on the surface. Still I managed to get all the stock milled I needed.

I noticed there was some stock which was significantly paler than the red oak, which may well be white oak. I’ve decided to incorporate them into the table tops, by sandwiching the red oak with the paler white oak, hopefully making an appealing visual affect.

Design

Sketchup has been used by woodworkers for several years since Google acquired it. I think this is mostly because it’s the first time that a CAD program has been available to woodworkers for the low low price of free. Google has since sold Sketchup to Trimble. For the time being Sketchup has remained free to use. One of the powerful features of Sketchup is it’s ability to interface with other custom programs. Most notable for woodworkers is Cutlist. This allows you to generate a list of the different parts for the project. It’s fairly easy to pick up the basics. It can also be handy if you’ve got sheet goods to cut up as it maps the parts out on the sheet.

My experience is that it’s easiest to design individual components as separate files, and then import them into your main project. This allows you to create the objects without being distracted by the overall design. I prefer to create an overall design, then almost start from scratch once I’ve got the components I need. The other thing I’ve discovered is that when you want to make a profile on an edge, it’s much easier to create the profile in 2D, then use the push/pull tool to then extrude the part.

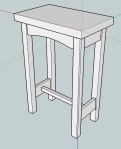
So here is the design I’ve come up with so far:

Drawbored Joinery?

The next question I have is whether to drawbored or not. This method of ensuring a mortise and tenon doesn’t come apart has been used for centuries.  Pros:

  • Adds strength to a joint I’m not at all versed in producing. As I mentioned, my kids are going to climb all over this thing. Not because I want them to, I just know my kids!
  • It can add a level of detail here, especially if I use contrasting woods. It’s common to see ebony used in joinery for this reason.

Cons:

  • This is another technique I don’t know that I’m going to have to learn.

Given that I wanted to learn more techniques when building this table, this con isn’t.

I had considered putting a 5 degree angle on the legs for the table to add a level of stability. However, adding complicated angles to mortise and tenon joinery isn’t on the cards this time round I don’t think. I need to perfect making mortise and tenons first! Maybe if I find this is too top heavy and falls over too easily I’ll re-consider.

Final detail

The final detail which isn’t on my sketchup is the method for holding the table top onto the frame. Wood is a natural product, and is designed to draw water into itself when it gets wet, and in so doing wood can often move and change shape, and has a tendency to move more across the width of the grain than along it. If a wide plank, like my table top is subjected to changes in humidity and temperature then there could be significant forces being applied which can result in a project tearing itself apart. So with the table top this needs to be taken into account. My current solution is to allow the table top to float by adding cleats underneath which are then screwed into the table top, and slots cut in the aprons on the sides. This will allow for movement in the wood, whilst holding the piece in place. This would be the cheapest method as I have screws, and I can cut slots in the aprons with a router before putting it all together. I’ve seen other people cut the slots with a biscuit joiner.

Another method is to attach figure 8 shaped pieces of metal to the tops of the aprons. These have elongated holes in them which allows the screws to move. This is probably the easiest method, if I can find the right parts.

The final way I’ve come up with, is to drill an elongated hole through the aprons. I’m not keep on this for several reasons, mostly because drilling through the apron could be problematic, but also it’s a little ugly.